


How to Blend Acrylic Paint [+ 5 Blending Techniques to Use]
If you’re ready to learn how to blend acrylic paint, you probably already know that blending techniques unlock a ton of exciting possibilities for your artwork. With properly blended colors, you can paint a wide range of subjects and scenery, real or imagined.
Below we’ll explain what exactly blending means and share some step-by-step blending techniques. This is a great intro for beginners or a quick refresher for more experienced painters.
What Is Blending and How Is It Different From Mixing Paints?
Blending is the process of fusing two colors together so that the paint transitions from one color to another, or combines to create a new color. A painting of a sunset is a classic example of blending because of the soft transition from deep red, to orange, to yellow.
There’s more than one way to blend paints together. Here are the most common types of blending techniques:
- Wet-on-Wet Blending
- Horizontal Blending
- Circular Blending
- Double Load Blending
- Wet-on-Dry Blending (also known as Dry Brushing)
- Using Glazes for Blending
Keep reading to learn the details of these techniques.
Blending vs. Mixing Paints
Blending is a much more gradual and gentle process than color mixing. If you’re blending paint, you’ll still have areas where you can see the two original colors. Another way to think about blending is that you’re creating a gradient from one color to the next. Mixing is the process of adding two colors together to create a single new color, so you don’t see the original colors afterward.
5 Acrylic Blending Techniques Everyone Should Know
Now, let’s get into the nuts and bolts of some common blending methods you should know. We’ll also include painting tips and ways to use these techniques. For more creative inspiration, check out our roundup of 27 easy acrylic painting ideas.
Blending Wet Acrylic Paints Together
First, let’s tackle the three wet-on-wet blending techniques, which, as you probably guessed, involves blending wet paint together.
1) Horizontal Wet-On-Wet Blending
With horizontal wet-on-wet blending, you’ll load up your brush with the first paint color, let’s say yellow, then paint strokes from left to right. (A Flat brush is helpful here, or you can try a Round or Filbert brush.) Try to apply an even amount of paint to your canvas, so it’s not too thick or too thin.
Next, you’ll load up your brush with the second color, let’s say orange. (No need to rinse your brush in between colors.) Using a left-to-right motion, apply the orange paint below the yellow and then gently blend it up into the yellow, still using a horizontal brush stroke. You can continue adding colors and blending them to create a gradient or ombré effect.
What This Type of Acrylic Paint Blending Is Commonly Used for
Horizontal wet-on-wet blending is perfect for enhancing painting elements like:
- Skies (day or night)
- Sunsets
- Oceans
- Metal
- Forest floors
- Fabrics, such as velvet
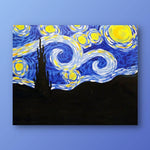
2) Circular Wet-On-Wet Blending
The next wet-on-wet technique to know is circular blending. For this technique, you’ll move your brush in a circular motion and work from the inside out, from the lightest colors at the center of the circle to the darkest colors on the outside of the circle.
For example, start by painting a circle of titanium white anywhere on your surface. Then, use your brush (or palette knife) to mix a little bit of red and white on your color palette to make a light pink color. Use your brush to paint the light pink in a circular direction around the white circle.
After that, pick up a small amount of white with your brush and use it to blend the border between the white and light pink together. Brush over this area many times to soften the transition.
Next, go back to your palette and use your brush to pick up the primary red (your red with the most pigment) and paint around the outside of your circle, but leave a little space in between the primary red and your circle.
Next, make multiple circular brush strokes to blend the red into the lighter pink color, adding more red or white as needed. Keep on blending in circular motions to achieve your desired look.
What This Type of Acrylic Paint Blending Is Commonly Used for
Circular wet-on-wet blending is perfect for enhancing painting elements like:
- Galaxy-like backgrounds
- Seascapes
- Knots in wood or trees
- Sand or desert conditions
Recommended reading: 14 Acrylic Painting Techniques That Beginners Should Try
3) Double Load Wet-On-Wet Blending
As the name suggests, double load wet-on-wet blending is when you load up your brush with two different colors at once to blend. In this method you’re not necessarily creating a gentle gradient; you’re creating a two-toned area.
To follow this method, you’ll load up part of your wide, flat brush with one high-pigment color, like blue. Then, dip the other part of your brush in another color, like white. (You can change up the ratio of one color to another, whether it’s 80/20, 50/50, and so on.) Using full-width strokes, brush the paint up and down, blending the white with the blue. Take care not to blend the two colors all the way through because that will get rid of the interesting variations and turn it into one solid block of color.
You can reload your paintbrush as many times as needed and repeat the full-width brush strokes up and down to cover your entire space. Adding a little water to your brush to thin the paint down can make double-load blending easier.
What This Type of Acrylic Paint Blending Is Commonly Used for
Double load wet-on-wet blending is perfect for enhancing painting elements like:
- Woodgrain
- Grass or water
- Forests or trees
- Mountains
Blending Dry Paint With Wet Paint
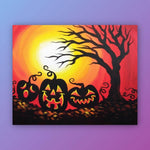
4) Wet-on-Dry Paint Blending (or Dry Brushing)
This blending technique has you combine wet paint and dry paint. It’s ideal for acrylic painting for beginners because you don’t have to work as fast as you would when using wet-on-wet techniques. That said, there is a little waiting involved with this method.
First, you’ll paint a base coat with one of your main colors. Generally, the base should be the darker of your two colors. Apply this base layer of paint and then let it dry. Acrylic paint is quick-drying, so it should be ready to go in 30 minutes or less. (It doesn’t need to be 100% dry, but the drier the better.)
Next, take your lighter color and start painting the bottom edge of the darker color. You’ll want to start with quite a bit of paint on your brush for this step. Use broad strokes to work the wet paint up the dried paint, without adding more paint to your brush. As you move up, you’ll have less and less paint on your brush, creating a gradient from light to dark. Continue this until you see your desired effect.
To make the blending more seamless, you can add water to your paintbrush.
What This Type of Acrylic Paint Blending Is Commonly Used for
Wet-on-dry paint blending or dry brushing is perfect for enhancing painting elements like:
- Nature backgrounds
- Hair or fur on animals
- Shadows
- Abstract scenes
Using Glazes for Blending
5) Acrylic Glazing to Blend Paints
Finally, you can add acrylic glaze or varnish to your bag of tools if you’re looking for interesting ways to blend paint. This is a great option if you’d like to have a lot of time to work with your wet paint once it’s on your surface, since glaze makes acrylic paint slow drying.
Similar to other blending techniques, you’ll paint a solid background with your first color (using the darker of your two colors). Next, mix a dollop of acrylic glazing medium into your second color. Glazes come in a variety of finishes including gloss, semi-gloss, and matte. One common type of glaze is Liquitex, which will give your finished product a marbled look.
(Don’t have any glazing medium on hand? No problem. You can also achieve similar effects by thinning your paint with water and layering thin washes of color over what's already been painted.)
Once you’ve mixed your glazing liquid into your paint, brush it onto the first color, starting on one edge and sweeping your paintbrush back and forth to create a smooth blend. Move towards the center of your surface with each stroke and using as much glaze as needed. Be sure to check the product label to use glazes safely.
What This Type of Acrylic Paint Blending Is Commonly Used for
Acrylic glazing blend techniques can provide added depth that plain paint can’t achieve, enhancing painting elements like:
- Marble or shiny stone backgrounds
- Glistening suns or moons
- Metallic sheen


